


Geographic Information Science uses software such as Geographic Information Systems (GIS) to manage, analyse and display data. "Every GIS comprises of 5 elements: computer hardware, software, data, personnel to run the system & a set of institutional arrangements to support the other components" (Aronoff, 1989)
Data
Geospatial data is increasingly available on the internet from the following links. Some larger datasets that have already been obtained are available on the UC network - see below.
This page links to tips and ideas on how to best use modelling software in the SEE (intranet only)
https://alsdo.canterbury.ac.nz/SEE/modeling/
The Local Geospatial Data Collection represents a number of datasets obtained over the years and retained due to size. In many cases it may be best to find the source in the links above and crop and download your area of interest.
To access this data on a UC Windows computer select Computer> Map network drive and make a network connection to \\file\bulk\geodata (no password required). Non-UC computer users must 'Connect using different credentials' and enter your UC username preceded with uocnt (e.g. uocnt\<yourusername>) plus password. This connection has a series of sub directories with short and hopefully meaningful names, described below. Many directories contain metadata - use is at your own discretion.
World\
- world_esri: world from Esri Data and Maps for ArcGIS 2018.
- world_gadm: Global Administrative Areas as of January 2012 from http://www.gadm.org/.
- world3m: World @ 1:3M scale - Digital Chart of the World as of the early 1990’s.
- world10m: World @ 1:10M scale – Esri Sample Data as of the late 1990’s.
- Global Relief Model: the ETOPO1_Ice_g_geotiff folder contains a 1 arc-minute global relief model of Earth's "Ice Surface" (top of Antarctic and Greenland ice sheets). Not downloaded here is a "Bedrock Surface" (base of the ice sheets). - https://www.ngdc.noaa.gov/mgg/global/global.html.
NZ\
- Chch: miscellaneous data sets...
- Greyscale_late_1990s_50cm NZMG airphotos from the late 1990's.
- Colour_24feb2001_10cm NZTM imagery post earthquake.
- Ch_CBD_QuickBird_25May2007_95cm.jpg NZMG
- CCC: Christchurch City Council building footprints and street centrelines
- CERA: Canterbury Earthquake Recovery Authority technical categories at 2013-12-04 and Land Check Colour Zones 2011 through 2012.
- ch_airphotos: AirphotoMosaics.gdb contains seamless ArcGIS mosaics of the individual images in the sub folders.
- ch_bus: Bus Stops 2001 & Routes for 1991, 96, 01, & 05.
- UC: University of Canterbury campus drawings from Facilities Management.
- Climate: NZ Climate Surfaces of New Zealand (NZMG) - estimates of mean annual temperature, wind speed etc.
- CRS: NZ Core Record System (NZTM) cadastral boundaries, roads, & more as at Jan 2006, for ArcGIS9 from EAGLE Technology ex LINZ.
- DEMs: Digital Elevation Models in current and old projections:
- NZTM (current projection):
- NZ_DEMs_25m_r_nztm ex Landcare LRIS Portal in 2021;
- NZ_SOS_15m_DEMs ex School of Surveying 2010 - incomplete;
- nzdem_8m_nztm ex Geographx - suitable primarily for cartographic visualisation, not terrain analysis;
- christchurch_15m_nztm ex LRIS Portal in 2014;
- Chch_Selwyn_1m_DEM_nztm LiDAR derived DEM 2011 + 2016.
- NZMG (because I'm reluctant to delete anything): North and South Island 25m (integer); and 25m_r (real precision, in 4 parts); and 500m;
- NZTM (current projection):
- Geology:
- QMAP_NZ_1M - a seamless version of the 21 QMAP maps @ 1:1,000,000 (NZGD_2000_NZ_Continental_Shelf_2000) including the geology of the Kermadec, Bounty, Snares, Antipodes, Auckland, and Campbell islands. Double-click on the exe to browse the contents; open the ArcMap, ArcReader or QGIS documents in the Data folder; view metadata in the Texts folder.
- QMAP_NZ_250K - a seamless version of the 21 QMAP maps @ 1:250,000 (NZTM). Double-click on the exe to browse the contents; open the ArcMap, ArcReader or QGIS documents in the Data folder; view metadata in the Texts folder.
- QMAPs - the 21 separate QMAP maps @ 1:250,000 (NZMG) as copied from CD. When browsing the data be sure to run and read the Start_Here.exe for each region. There are existing ArcGIS map documents (*.mxd) in each regions qmap folder, or you can individually load the underlying data from the qmap\data folder.
- KiwImage: NZ and Offshore Islands imagery captured by DigitalGlobe using the Quickbird II satellite. The ~15TB of data includes three 'products' (see the Kiwimage MOU LINZ UC for more detail including a map sheet index of what's available). Access to and use of this data requires Kiwimage data UC access sign-off. The data is tiled to the NZTM NZTopo50 map series - see the spreadsheet and shapefiles in the KiwImage Metadata> Metadata NZTopo50 sheets folders for information on individual tiles, while date of capture is in the North Is and South Is sub-folders. The data coverage is incomplete - for more information see the LINZ website.
- Basic Product (2.4m Multi-spectral and 0.6m Panchromatic suitable for image analysis).
- Bundle Product (2.4m Multi-spectral and 0.6m Panchromatic suitable for image analysis)
- Natural Colour Product (Pan Sharpened) (0.6m ortho-rectified, colour-balanced RGB mosaic appropriate for use in a GIS-environment)
- LCDB: Land Cover Database version 4.0 (NZTM) polygon features representing the land cover type at each of four periods; the summers of 1996/97, 2001/02, 2008/09 and 2012/13.") | the LCDB folder also contains a simplified version of Agribase (NZMG) from Dec 2000, a national spatial farm database showing major farm types on pastoral land.
- LENZ: Land Environments of New Zealand (NZMG) 2003.
- LiDAR: The data listed below is stored ‘as received’ – i.e. a mix of raw point cloud data and processed products (e.g. DEM, DSM, ortho-photos and mosaics), in different formats, tile layouts, and projections, some with metadata, some without, and some restricted access. Make of it what you can - in many cases it may be best to go to the source and crop and download your area of interest. To see what’s available, including metadata, check the LINZ Data Service Elevation Survey index or Canterbury Maps or Elevation Aotearoa.
- Auckland - 2005-08 (NZTM)
- Christchurch
- 2003_07_06 (NZMG) - CCC LiDAR 2003 readme gridded ground data | CCC LiDAR 2003 intensity and trajectory data | restricted access: CCC LiDAR 2003 access sign-off.
- 2010_09_05 (NZTM) - ECAN UC 2010 LiDAR Overview | restricted access: ECAN UC 2010 LiDAR sigh-off.
- 2011_03_08 (NZTM)
- 2011_05_20 (NZTM)
- CGD_5mDEMs_2003_2012 (NZTM) - Canterbury Geotechnical Database, a suite of 5m DEMs derived from Aerial LiDAR surveys flown before, between and after each of the major earthquakes in the Canterbury Earthquake Sequence for insurance assessments and reconstruction work.
- Christchurch_Selwyn_2015 (NZTM) - DEM only and tile index
- Halswell_Ellesmere_2008 (NZMG) - data is not as described in the metadata but supplied as points in an ArcGIS geodatabase, and as XYZ values in *.txt files.
- Hope Fault LiDAR 2015 - extents and metadata only (restricted access).
- Kaikoura_Hurunui 2012/13 (NZTM) - metadata PDF's are in the sub-folders.
- Kaikoura PostEQ 2016 (NZTM) – from a Geology server, no metadata.
- Rangiora 2014 FPFA1064 (NZTM) - metadata PDF's are in the sub-folders.
- Rolleston_2016 (NZTM)
- Tekapo_LiDAR 2016 (NZTM)
- Waimakariri_2003_05 (NZMG)
- LINZ
> AirPhotos: photo and survey footprints from the LINZ Data Service (LDS) - try RetroLens.
-
- BrewsterGlacier - High-res ungeoreferenced tifs, survey number SN* 1053 & 5941.
- Edgecumbe - High-res ungeoreferenced tifs, survey number SN* 256, 596, 1409, 1883, 1906, 1908, 3486, 3580, 5379, 5433, 5977, 8240, 8732, & 8763.
- Tongariro - High-res ungeoreferenced tifs, survey number SN* 171, 554, 853, 1035, 2853, 5021, 5053, 5147, 5752, 8280, 8440, & 9990C.
- LDS-historic-aerial-photos-photo-footprints-1936-2005-FGDB
- LDS-historic-aerial-photos-survey-footprints-crown-1936-2005-FGDB
> lds-nz-road-centrelines-topo-150k-FGDB: 1:50K Road Centerlines from the LINZ Data Service (LDS)
- Lucas: Land Use and Carbon Analysis System Programme - SPOT-5 and Sentinel2 multispectral images suited to vegetation classification (for years 2013, and 2016 – 2021, @ 10m resolution, NZTM), plus control images and metadata feature classes with capture dates. Please see the Terms of Use and End User License Agreement (EULA) for permitted uses by UC, which cover teaching and research. NOTE: 1) “aref” = actual reflectance (includes atmospheric corrections and Bidirectional Reflectance Distribution Function (BRDF) corrections – please see attached metadata describing that) and 2) “sref” = standardised reflectance, which additionally removes terrain shading effects and masks out all cloud.
- NIWA New Zealand bathymetry: NZBathy_2016_shape (vectors) and NZBathy_DTM_2016_binary_grid (WGS84 datum) - Further information
- nzRoad_network: (NZTM) a road network analysis layer with travel time estimates, developed by UC's GeoHealth Lab in ~2016, using Open-source Data (New Zealand Open GPS project (NZOGPS). To use this in ArcGIS, map a drive to \\file\bulk\geodata, then make a folder connection to it in ArcMap Catalog, then open the NZ\nzRoad_network\nzogps_240215_nal.gdb and drag in the nzogps_240215_nal Feature Dataset (i.e. the network comprised of three feature classes), and you should be in business.
- nzTopo50_NZMG: released ~2000 NZ @ 1:50K scale Topo data from Terralink NZ – superseded by the nzTopo50_NZTM or online basemaps.
- nzTopo50_NZTM: released in 2009 tiled to the NZTopo50 map series – the top level folder has indexes to the North & South Island map sheets in PDF format, and a complete NZ_coastline_and_islands.
- StatisticsNZ: Selected census boundaries and tabular data.
Software
UC has a range of geospatial software from proprietary to free and open source. Perhaps the main geospatial software is ArcGIS from Environmental Systems Research Institute (Esri), for which UC has an educational site license that covers use by students and staff. Note that licenses require annual renewal on 30 January - this is automatic for UC computers, while home use license files will be made available alongside the install files.
- ArcGIS on UC computers can be installed and licensed from Software Centre while on campus, while off campus use requires a full VPN login connection from ITS to be able to see the on campus Concurrent User license manager. Concurrent licenses can also be borrowed for off campus use - this is a must for off-grid use on a UC laptop - see below.
- ArcGIS home use on student and staff computers is enabled by obtaining install files and Single User licenses from the UC network - see below.
Using ArcGIS Pro/Online at UC
1. Start ArcGIS Pro (or go to ArcGIS Online (https://www.arcgis.com)) and click “Sign In”.
2. Click Your ArcGIS organisation’s URL and enter ucnz then Continue (ucnz should be sufficient, while the full URL is ucnz.maps.arcgis.com).
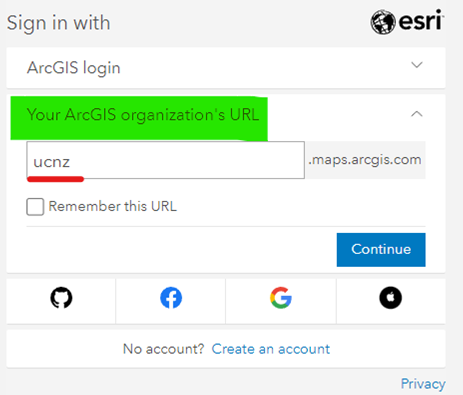
3. Click University of Canterbury (ignore ArcGIS login).

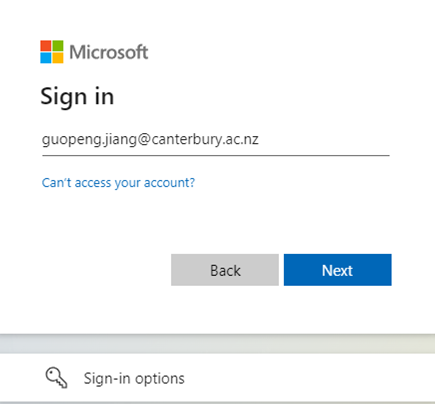
4. Sign in with your UC email and your UC password. Then your Microsoft multi-factor authentication code.
Installing ArcGIS Pro Off-site (from ArcGIS Online)
Firstly you will require an active ArcGIS Online account which should have been assigned to you as part of your study.
Login to ArcGIS Online as outlined above. Then please follow the download instructions for the client here: Download ArcGIS Pro—ArcGIS Pro | Documentation
Specifically, under the section labelled “Download ArcGIS Pro from ArcGIS Online”.
