


My Timetable Help - For Students
The following will give you tips on how to use the 'My Timetable' system.
The following will give you tips on how to use the 'My Timetable' system.
To view your timetable, click the Timetable link in the top right-hand corner of the page.

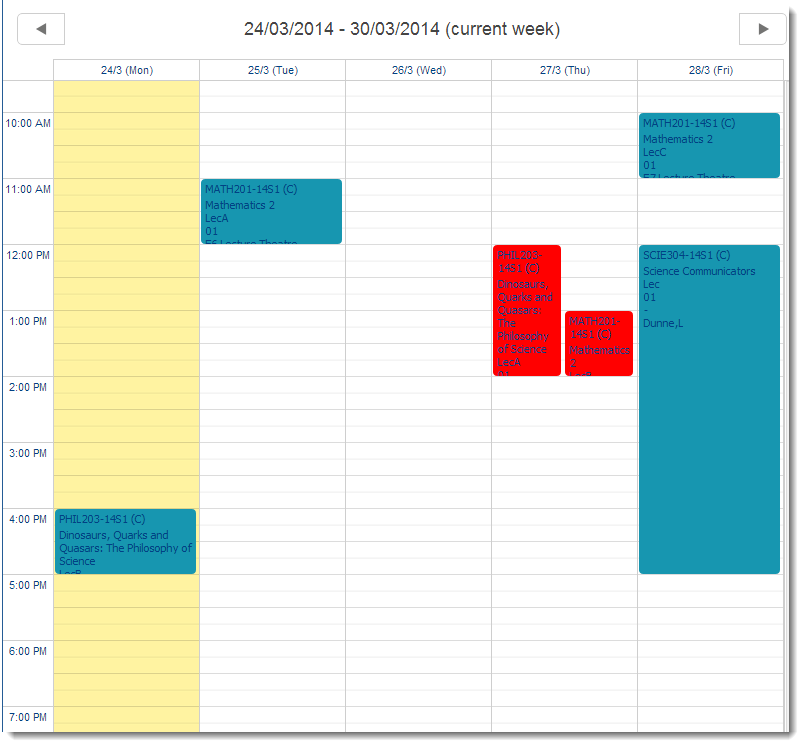
If you are viewing your timetable before the start of the semester, the default view will be All Weeks; otherwise, the system will default to the current week.
You can change the week you are viewing by using the slider or the two arrows, and the dates of the selected week will be displayed underneath.

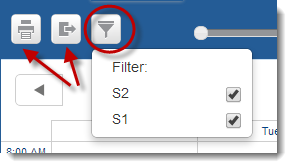
You can filter your timetable by semester code by clicking the Filter icon and de-selecting the semesters you don’t want to see.
You can also print or export the currently displayed timetable using the other two icons.
Your timetable will display with today’s day highlighted in yellow. Any clashes will be shown in red.
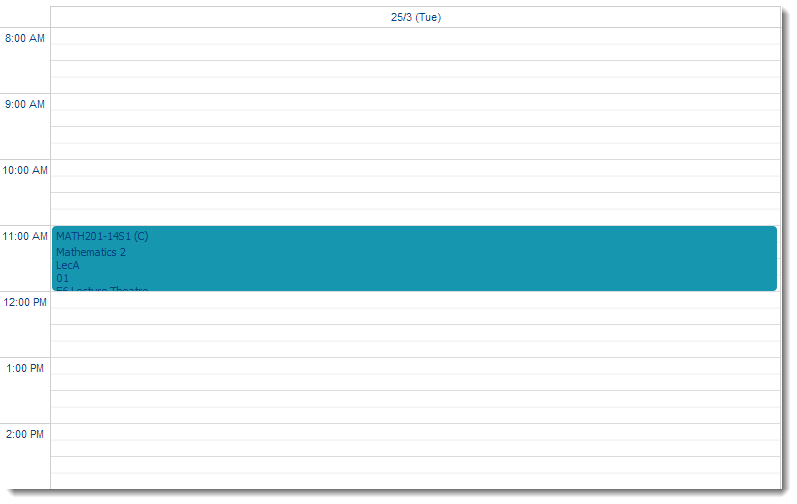
To view the timetable for a single day in detail, click in the white space on that day. To return to the week view, click in the white space again.
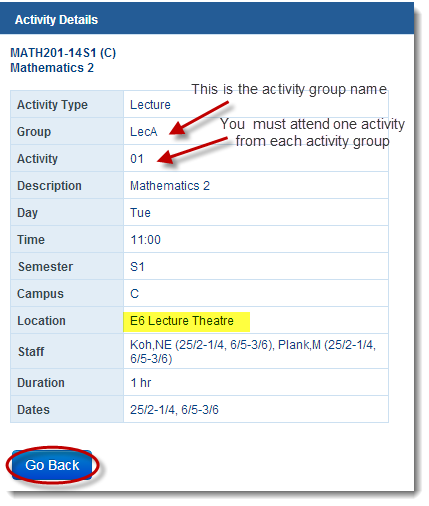
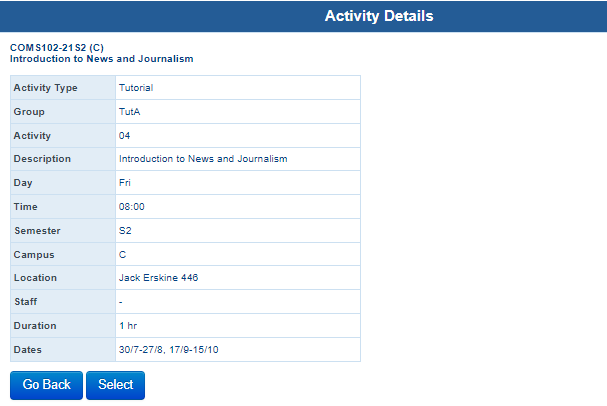
If you need to see more detail about an activity, click on the activity in the timetable view, and the Activity Detail page will open.
The activity group name and activity number are shown, along with the day, time, and location details.
If the activity takes place in different locations on different weeks, this will be listed in the Location field. Click Go Back to return to the timetable.
An activity stream is when there are multiple instances of the same activity - i.e., more than one day/time available for selection.
You will only need to attend one stream for each activity (i.e., Stream 01, 02, or 03 for activity TutA).
Some departments allocate students into streams, while others allow students to self-allocate into a stream of their choosing. Please see further information below regarding this process.
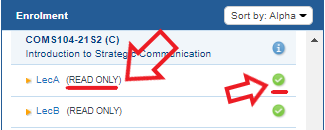
For an activity to show on your timetable, you must be allocated to that activity.
You will either:
Where there is only one stream available (i.e., only one day/timeslot) for an activity, you will be automatically allocated.
The activity will be shown as ‘(READ ONLY)’ and will have a white tick in a green circle to indicate that you have been allocated.
Allocations may be managed by your course coordinator. If you wish to change your allocation, please contact them directly to see if this is possible.
The activity will be ‘Read Only’, and a white tick in a green circle will indicate that you have been allocated.

To view the details of the stream you have been allocated to, click on the activity.
The following information will be displayed in the right-hand frame, showing which stream you have been allocated to. It includes details such as the date, time, and location for each stream.
Please take note of the weeks in which each activity takes place, as they may not run every week and could start later in the semester.

Please contact your course coordinator if there is a problem with the stream you have been allocated to.
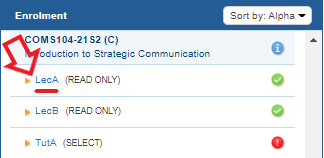
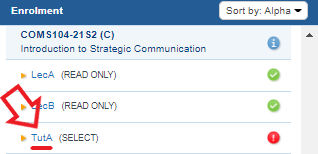
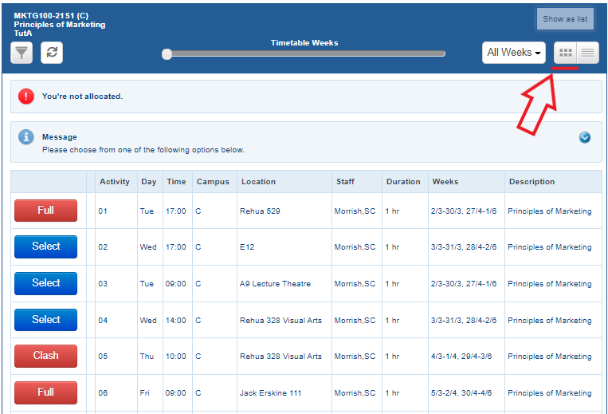
You may be able to self-allocate to an activity stream and choose which stream you would like to attend.
If this is the case, the activity will display as ‘SELECT’, with a white exclamation mark on a red background to indicate that you still need to choose a stream.
Please note that self-allocations may not open until 2–3 weeks before the activity is due to begin, and you won’t be able to allocate yourself until this time.

To view details of the streams that can be selected click on the activity.
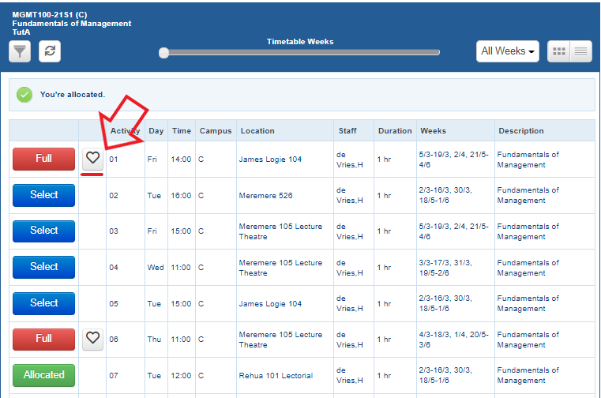
This will display the List View, showing the days, times, and locations for each stream.
The red ‘Clash’ button indicates that the stream conflicts with something already on your timetable, while the red ‘Full’ button means the stream is full and cannot be selected.
To choose a stream, simply press the blue ‘Select’ button next to your preferred option.
If you wish to allocate to an activity option that is currently full, you can request a swap by clicking the heart icon.
This means that if and when a space becomes available in that stream, you will be automatically allocated to it. In the meantime, you’ll remain in your current allocation.
If your choice is successful the following message will display:

If all the stream options are either full or clashing you will need to get in touch with your course coordinator and they can help find a solution for you.
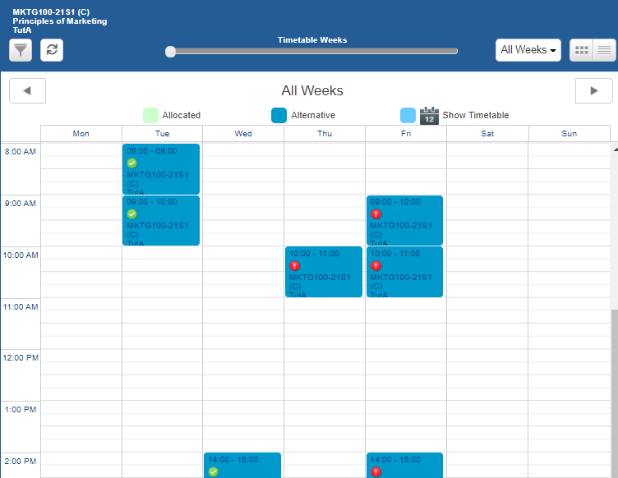
There is an alternative view that can help you choose the stream that best fits your timetable.
To switch views, select the Grid View icon in the top right-hand corner of the page. (The default view is List View.)
This view displays the activity streams within your timetable, allowing you to select the stream that best fits your current allocations.
Streams with white ticks in green circles are available for you to choose, while those with white exclamation marks in red circles either clash with existing allocations or are full.
You can also view your current timetable selections in this view by selecting the ‘Hide Timetable’ icon, which will then switch to the ‘Show Timetable’ view.
Please note that you need to be careful, as this view displays activities for both S1 and S2.
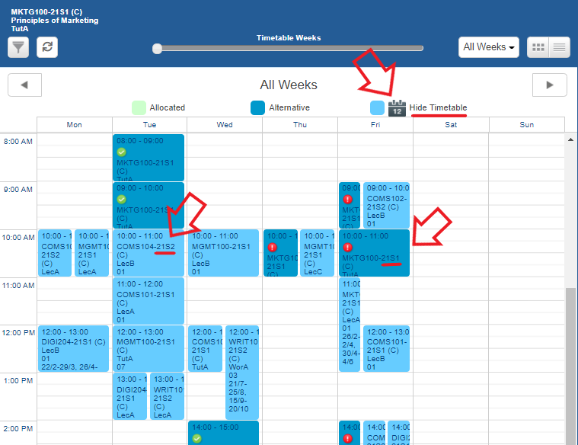
If you decide to change your allocation from the Grid View, simply click on the stream you would like to select, and the next page will be displayed.
If you are happy with your choice, press the Select button.
The following message will appear - simply press Continue, and you will be returned to the Grid View, which will now reflect your updated selection.

You can also change your selection from the List View by clicking the Select button next to the stream you want to choose.

Once all your activities have been allocated, you can view them on your personal timetable.
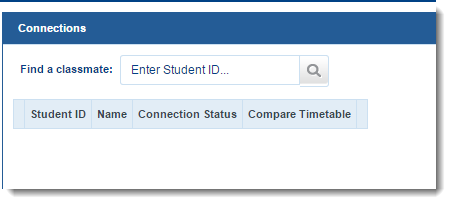
My Timetable Connections allows you to share timetables with classmates and view both their timetable and your own in the same view.
This is useful for finding times when you are both free.
To add connections, click LiveCal, then select Connections.

You will be given the option to enter a classmate's Student ID.
This is the number found on their Canterbury Card.
Once you enter another student’s ID, a request will be sent to them, allowing them to either approve or decline your invitation to share calendars.
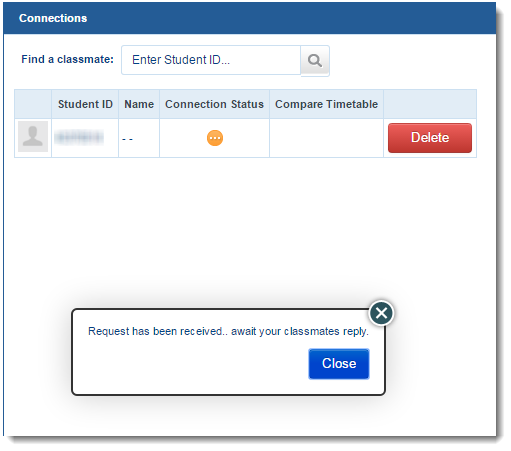
This request will appear in your classmate's Connections area, where they can either Accept the invitation or Delete it.

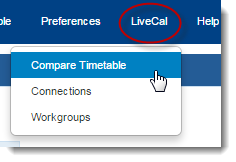
If you want to overlay calendars with your connections, click the Compare Timetable link under LiveCal.
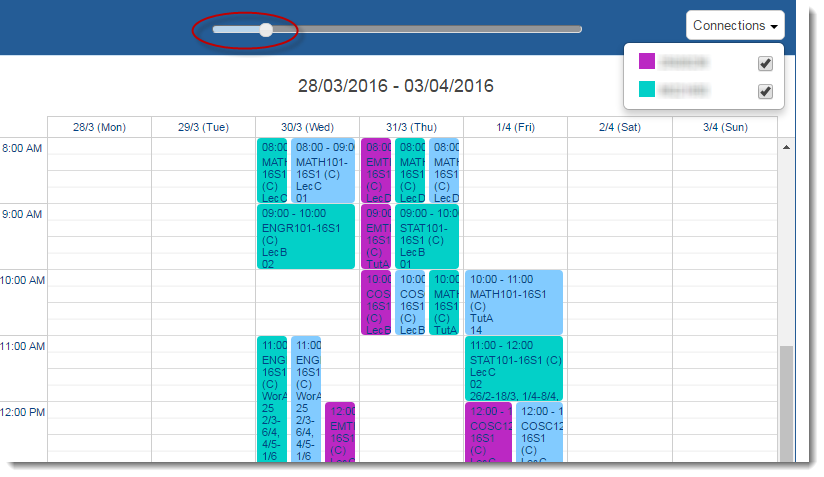
You can select connections to overlay using the tick boxes under Connections.
Your own timetable will appear in light blue, while your connections’ timetables will display in the colours indicated.
Remember to select the week to overlay using the Weeks slider; otherwise, all weeks will be shown (including courses running in the other semester).
This feature allows you to find times when all of you are free. You can then book what is known as a workgroup.
A workgroup is an activity not attached to any course, but it will appear in your timetable and the timetables of your connections.
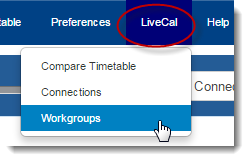
To book a workgroup, click LiveCal, then select Workgroups.
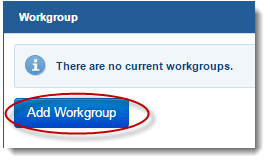
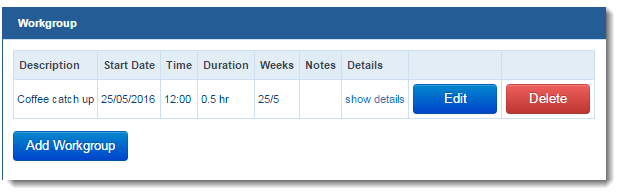
To add a workgroup, click Add Workgroup.
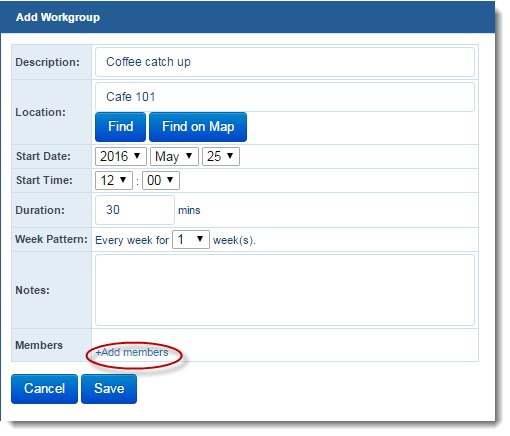
You can fill out the details of your workgroup on this page.
The Find and Find on Map buttons use Google Maps to search for the location you entered. These will likely return results in the US, so they are not useful.
To add your connections to the workgroup, click Add Members.
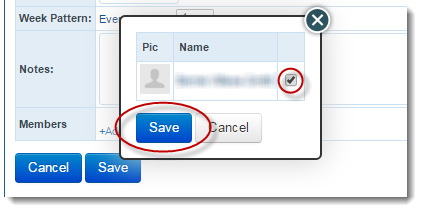
Select the connections you want to add to the workgroup, then click Save.
Click Save again, and a summary of your workgroup will appear in your Workgroups area.
You can edit or delete the workgroup using the buttons provided.
The workgroup will now appear on your timetable, as well as in the timetables of the connections you added.
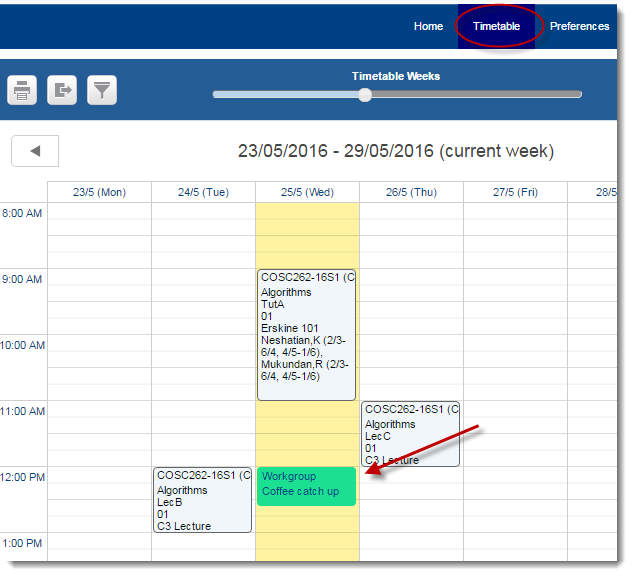
You can click on the workgroup to view or edit its details.
